Using the Ladybug in a Mobile Setting
Overview
You can use the Ladybug spherical vision camera to capture video in a mobile environment. One common scenario involves capturing location-based visualizations for display in geographical mapping applications. Some of the components necessary for setting up a mobile operation are included with the camera. Other items must be acquired separately.
The factors to consider when using the Ladybug in a mobile setting may involve some or all of the following:
- Using a laptop (notebook) computer and laptop mount with the camera
- Powering the camera
- Attaching the camera to your vehicle
- Using a global positioning system (GPS) receiver
Using a Laptop Computer
In all likelihood, you will require a laptop computer as part of your Ladybug mobile setup. You need a laptop to do the following:
- Monitor and view the transmission of images as they are captured.
- Write and store streaming video files.
You will need the following components for interfacing with a laptop computer:
|
Ladybug6 |
Ladybug5+ |
Ladybug3 |
|
5-meter USB 3.1 cable with locking screws (ACC-01-2310) |
5-meter USB 3.1 cable with locking screws (ACC-01-2301) |
10-meter 1394b cable with locking screws |
|
24 V 2.5 A (60 W) power supply (ACC-01-9001) and a GPIO wiring harness |
||
|
Most laptop computers provide a built-in USB 3.1 port. The host controller card provided in the development kit is not intended for use on a laptop computer. |
IEEE-1394b ExpressCard for notebooks. While your laptop computer may provide a built-in IEEE-1394a port this limits you to a data rate of 400 Mb/s. The 1394b host adapter card provides the necessary bus interface to achieve a 1394b rate of 800 Mb/s. Simply insert the card into the ExpressCard slot of the computer. |
|
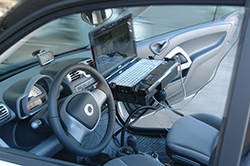
A common setup involves mounting the camera on the top of your vehicle, passing the cable(s) through an open window crack, and connecting to the laptop inside the vehicle.
The Ladybug6 has worked successfully with the following systems:
- HP Elitebook 830 G5
- Lenovo P50
The Ladybug5+ has worked successfully with the following laptops:
- Dell Precision M3800 (2014 model)—tested and recommended by Teledyne
- Intel NUC D34010WYK
- Gigabyte Brix GB BXi7-4500
- MacBook Pro (running Bootcamp)
 |
For more information on Ladybug recommended configuration, please see TAN2015008 Best Practices for Ladybug. |
Additionally, you need to consider the capacity of your laptop to write the streaming video files produced by the Ladybug system. Ladybug images are saved in sets of stream files that are written to the hard disk of the laptop at up to 240 MB/second on USB 3.1 and 80 MB/second on FireWire. To accommodate this input, we recommend your laptop be configured with striped disks, such as provided by a RAID 0 configuration.
The following is a recommended system configuration:
|
Ladybug6 |
Ladybug5+ |
Ladybug3 |
|
|
|
Although a shorter cable (5 meters or less) is recommended, a hub and active cables may be used to extend the cable length beyond 5 meters and to improve connectivity. We recommend using a hub when using a laptop or when using cables longer than 3 meters.

|
Finally, for ease of use inside your vehicle, we recommend mounting your notebook computer using a laptop mount. This device, which fits into the mounting bolts of your vehicle’s passenger seat, provides a stable surface for the passenger to work while the vehicle is in motion.
|
 |

Powering the Camera
The Ladybug6 and Ladybug5+ require 12 – 24 volts of power which must be provided by an external power supply connected to the GPIO cable.
The Ladybug3 requires 8 -30 volts of power. The IEEE-1394b ExpressCard for notebooks requires an external power source to provide power to the camera. However, if your notebook includes a built-in 1394b port, power to the camera can be supplied through the FireWire cable.
One source of external power is from your vehicle’s battery. To tap into this power with ready-made connectors, use a 12 V DC-to-AC electrical inverter in conjunction with an AC-to-12 V DC power adapter (“wall wart”). This should output at least 200 W, enough to power both the camera and the notebook computer. The power adapter connects to the GPIO power cable for Ladybug6/Ladybug5+ or directly into the side of the ExpressCard for Ladybug3.
Attaching the Camera to Your Vehicle
Many third-party mounting systems are available for securing the Ladybug to your vehicle.
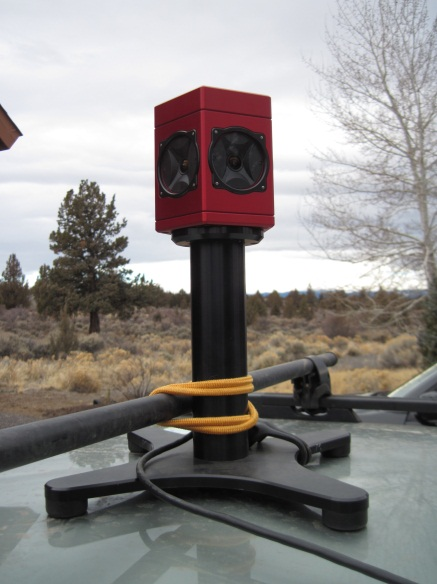 |
A temporary solution is to attach the desktop mount to a fixed roof top cross bar with a bungee cord. Alternatively, the Ladybug development kit comes with a tripod adapter, if you wish to attach the camera to your own mounting system, which you then attach to the vehicle. For additional security, consider harnessing your mounting system to the vehicle roof with tether cord.
|
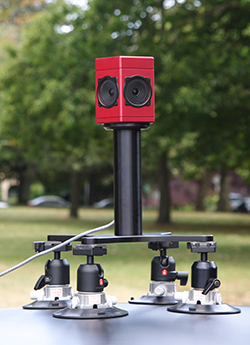
One method is to attach the Ladybug to the top of your vehicle by fastening a ball camera mount and suction cups to the desktop mount. Ball mounts and suction cups must be purchased separately. Each ball mount should have a ¼’’ screw on top to fit the same-sized screw hole on the bottom of the Ladybug tripod mount. Additionally, the bottom screws of the ball mounts should fit into the tops of the suction cups. Note that suction cups are not considered a long-term secure method as they fail over time. |
 |
|
|
Mobile mounting brackets and suction cups are not manufactured by Teledyne and we assume no responsibility or liability for them. They should be mounted only in accordance with the manufacturer’s instructions and all appropriate safety precautions should be taken. Teledyne assumes no responsibility for use of our products in any mobile operation. Customers undertaking such operations do so at THEIR OWN RISK. |
Using a GPS Receiver
When a GPS receiver is connected to your laptop, you can use the Ladybug SDK to insert NMEA data into Ladybug images. The data can then be extracted at a later time to generate HTML data for display as a Google Map or KML data for Google Earth. The GPS receiver should have a serial or USB interface for connecting with your laptop and be able to stream NMEA data in real time.
To get started using the GPS functionality of the Ladybug library using the LadybugCapPro application, refer to the topic, “Working with GPS Data” in the Ladybug SDK Help. To get started using the Ladybug library directly, refer to the topic “How-To: Using GPS.”